Sidechain compression is not just a stylistic effect; it is the single most important technical skill for any producer aiming to achieve a powerful, professional low end. In electronic music, consequently, the kick drum and the sub bass line often occupy the exact same low frequencies, causing them to clash, cancel each other out, and result in a “muddy” mix.
This guide details the crucial steps and parameters for setting up sidechain compression, ensuring your kick drum always punches through, and your sub bass remains tight.
1. Understanding the Sidechain Principle
First, let’s clarify the mechanics. Regular compression reduces a track’s volume when its own signal gets too loud. Sidechain compression, however, uses the volume of one track (the Trigger, usually the kick) to control the compressor placed on a completely separate track (the Target, usually the bass).
In other words, every time the kick drum hits, the bass ducking plugin is told to quickly turn the bass volume down, creating a necessary rhythmic “pocket” of silence.
2. The Classic Setup: Kick to Bass
The process is consistent across most DAWs (Ableton Live, Logic Pro, FL Studio), although the exact routing names may vary.
Identify the Target: Place a compressor plugin on your Bass Channel. This is the sound you want to be turned down.
Select the Trigger: In the compressor settings, look for the Sidechain Input or Key Input option. Then, select your Kick Drum Channel as the trigger source.
Mute the Send: Ensure that the kick drum signal sent to the sidechain input is not also routed to the main mix output. Consequently, you only want the signal to control the compressor, not to be heard twice.

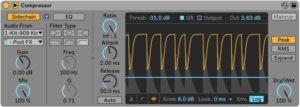
3. Dialing in the Key Parameters (The ‘Pumping’ Effect)
The magic of sidechain is in the Attack and Release controls. These settings define the character of your low end.
| Parameter | Recommended Setting | Function & Transition |
| Ratio | 5:1 to 10:1 | This determines how much the bass volume is reduced. Therefore, use a high ratio for an aggressive, obvious “pump” (EDM/House) or a lower one for subtlety (Techno). |
| Threshold | Adjust until you see 3-6 dB of gain reduction on the meter. | This dictates the loudness the kick must reach to activate the compressor. Furthermore, this controls the depth of the ducking effect. |
| Attack | Fast (0ms to 5ms) | The attack must be lightning-fast to ensure the bass volume drops the exact moment the kick drum’s transient hits. In fact, a slow attack risks a click sound. |
| Release | Medium-Fast (80ms to 150ms) | This determines how quickly the bass volume returns to normal after the kick is gone. However, this is the most crucial control for setting the rhythmic feel of the track. |
4. Advanced Techniques for Clean Low End
As your production skills evolve, you can use specialized tools for greater control:
Sidechain Volume Shapers: Alternatively, specialized volume modulation plugins like Xfer’s LFO Tool or Cableguys ShaperBox allow you to draw the ducking curve manually. This is a common pro tip for achieving a smoother, more transparent low end that traditional compressors cannot replicate.
Multiband Sidechain: Moreover, tools like FabFilter Pro-C 2 allow you to apply the sidechain effect only to the low frequencies of the bass. Consequently, the mid-range of your bass remains untouched, preserving tone and color while cleaning up the muddy bottom end.
In conclusion, mastering the kick and bass sidechain is non-negotiable for low-end clarity. By understanding the interaction between the kick and the sub bass, you will give your tracks the essential punch and dynamic control needed for any club system.